Pages

Showing posts with label Decoupage. Show all posts

Friday, June 10, 2016

Decoupage on metal

Decoupage bug has bitten me. I have completed many decoupage projects. I had learnt decoupage few years ago. My first decoupage was on an aluminum plat, about which I have written in post Decoupage.
Decoupage
Decoupage on aluminum plate
 Few years I did not work on any decoupage project.This year completed many decoupage projects in the process of decorating my craft room. One with a craft table  and also on a shelf to keep in my craft room. And recently on mdf box, with paper napkin.

 Decoupage on  metal :  

 This project also part of decorating my craft room. As I paint sometimes , I have collection of paints and  brushes. Recently when I visited Itsy Bitsy shop I bought some metal containers and holders. These can be bought online also. Here it is :
Metal tin
Metal tin
 As the first step , applied primer:
After application of primer
 I had some decoupage papers with images of old streets of Italy. I don't know whether streets in Italy look like this , but the shop keeper told be this is decoupage paper with images of streets in Italy :). Here are those decoupage papers:
Decoupage paper
Decoupage paper with image of streets in Italy. That's what the shop keeper told me :)

 Next step to attach the papers on the tin:
decoupage
Tin attached with paper
I have used modpodge for this project , as the size of the tin is small. And painted with colors matching to the design on the papers.
decoupage
It is ready to hold paint and brushes
 Now it is ready to hold the paint and brushes I have.

Many craft learners ask me whether to use fevicol or modpdge  for decoupage. In case the object is big in size like shelf or table etc I use fevicol to stick the paper and to give gloss I use modpodge. If the object is small I use modpodge to stick as well as for gloss. 

Made one more box with Warli design , soon will share about that.

Love , laugh and live the life to the fullest,
-Ranjana

Tuesday, May 24, 2016

Decoupage table- to make a table look new

This year I have worked on many decoupage projects. Decoupage table for my craft room, then a decoupage shelf for the same. I feel decoupage is a simple craft which gives great results. The object gets transformed to look new. The simple wooden basket is made to look antique with miniature painting, by using some papers and glue.

Decoupage table this time: 

My son, who was observing me working on decoupage was astonished to see the results. His table was looking old, so he got an idea to make it new by using decoupage.He told me to make it new with decoupage. His old table looks new now with floral design on it:
Ok , before decoupage, how was it looking? Here it is:

What a transformation using decoupage!!!  And it is simple too.
I always use fevicol for decoupage if the size of the object is big. Here also I used paper with floral prints and fevicol. Made broad strips of the paper and glued it with fevicol.
Then applies glue on top of it also to give a shiny look.
 My son is very happy with the look now, though he wanted animal print paper for it. I could not get animal prints paper, at that moment.

Now  I have few decoupage papers with animal prints, planning to make some more projects using those.

Love , laugh and live the life to the fullest,
-Ranjana

Thursday, April 14, 2016

Decoupage Box- Antique look

Recently worked on many decoupage projects. I feel among all the crafts, decoupage is less time consuming and gives magical transformation. In the process of decorating my craft room, I'm making many handmade items . I have already shared about the craft table made,  and the shelf transformed with decoupage.  This is one more decoupage box to decorate my craft room.I have used antique look paper with miniature painting.
Here is it with my craft supplies:
Decoupage box
Box with my craft supplies


How to make decoupage box with antique look(Tutorial)

This is a wooden box, which I got it made by a carpenter. The first step is to paint with primer.

Decoupage box
First paint with primer

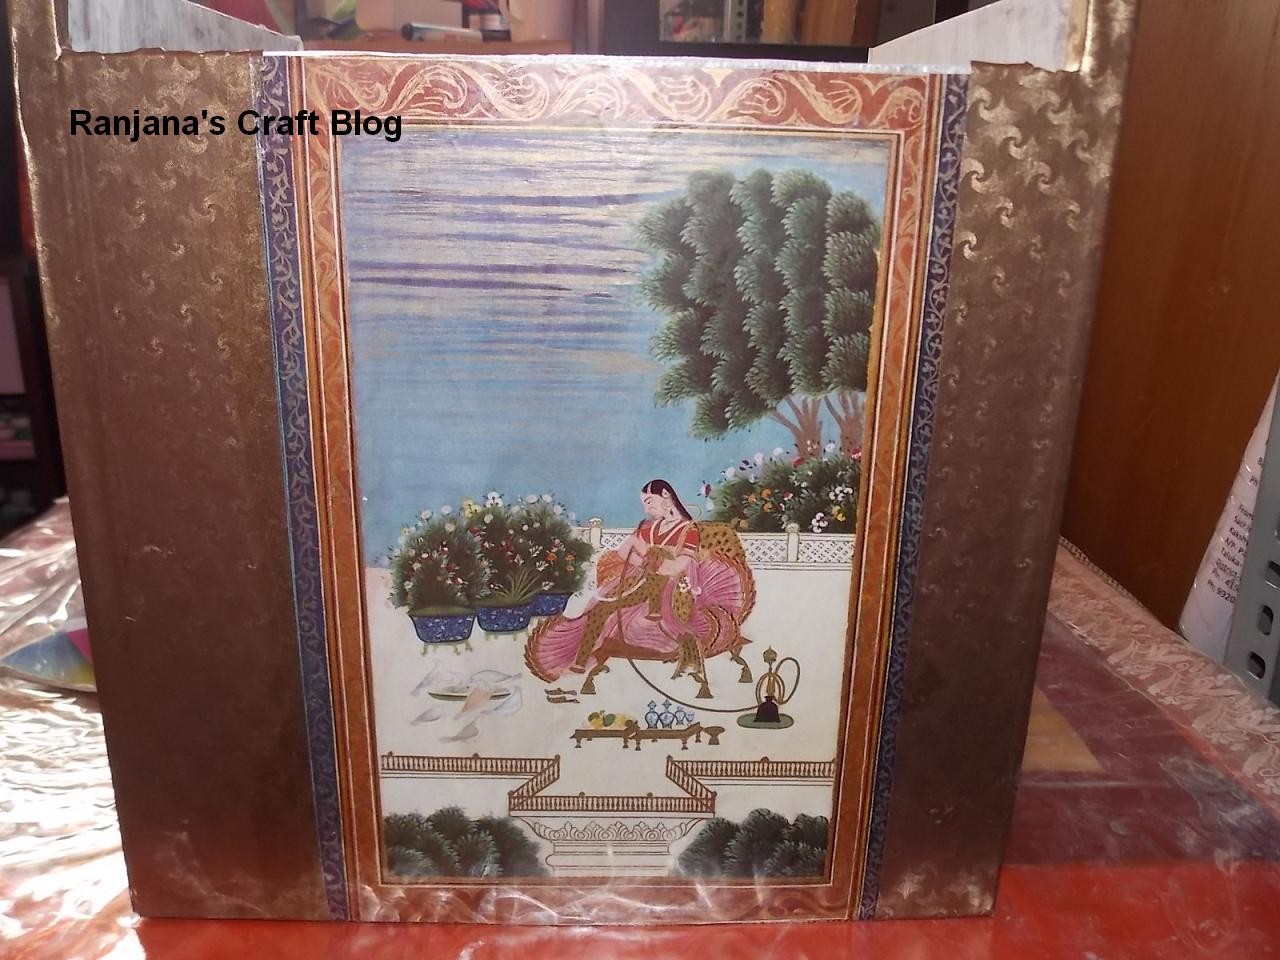
 I have some miniature paintings replicas , which I had got when I had visited Salar jung museum , Hyderabad. Attached it on one side of the box.
Decoupage box
Miniature paint attached
To give antique look, I selected a paper with antique look. Attached it on all the sides of the box.
This time I used Modpodge for the decoupage. I felt it was very easy to handle and the finishing was very nice.
Decoupage box
With antique paper attached

Here is the box completed:
Decoupage box
Completed box

Inside also painted with brown color and outside with a modpodge. It looks like antique box. Hope to complete many more projects in coming days. Will definitely share with you all.

Love , laugh and live the life to the fullest,
-Ranjana

Saturday, November 21, 2015

Decoupage - shelf

While learning decoupage I had made of on  aluminium plate and recently I had done it on my craft table . As I'm preparing my craft room and decorating with handmade items, thought of decoupaging on a shelf I have.
Here is the shelf, I got it made from a carpenter:
I wanted to give this Victorian look, chose very mild color. Back side first one coat painted with primer and then painted with pista green.
For the top and the sides selected the pista green color paper with rose prints. I just loved the paper!
After attaching and painting , it looks like this:
Decoupage
And now for the inner side of the shelf, I wanted to paste same pista green paper, which I had chosen  for the top and sides. But there was shortage of paper for the inner side. So used two different kinds of papers.
Here is how it looks after pasting the paper:
Decoupage

Decoupage
As a final touch of giving Victorian look , attached the thread lace which my friend had given, to the borders.
This is how it looks now.

Decoupage

Decoupage
I hope it has now at least little bit of Victorian look, what I'm murmuring :-). This I have kept in my craft room, with my craft items. I will share about other handmade items in my craft room in the coming posts.

Love , laugh and live the life to the fullest,
-Ranjana

Sunday, October 18, 2015

Decoupage - My craft table

Returning after a month to blogosphere. Life was hectic, due to father's health issues I had become like a shuttle between hospital and home. Due to stress I could not make anything. Now everything is sorted out. After his bypass surgery, my father is back to normal life. Returned to native Kumta.   Slowly life is coming back to normal. I  needed some refreshment, what else can refresh me other than my passion Arts and Crafts :)


As any craft person, even I always wished to have a craft room. I worked in many forms of arts and crafts, from sewing to paper craft, thread crafts like crochet, tatting , jewelry making, school projects, painting, sketching.... ( jack of all master of none :)). But the major problem with any crafts person is accumulation of crafts materials. I'm not an exception to it. Family members always blame about the loads of craft materials. Its obvious that a crafts person needs a well organized place with craft materials. I also wished the same, but I did not have a separate room for this. I turned a small unused space in my house into craft room.  In a craft room the craft table is very important. For me its comfortable to sit on floor and work on crafts. So I preferred a short table. Got it done by a carpenter. I told the carpenter to not to polish it so that I could decorate it according to my idea.

I thought decoupage will be the best, so chose a picture to paste on it. Here it is, with the picture I selected to decoupage:

First applied the wood primer , and pasted the picture on the top of the table.


The extended the picture with little bit of oil painting:

Finish it with painting on the borders. I thought dull brown color would look better, instead I selected bright colors. As this is the table where I spend time exploring my creativity. It should be bright :)
 I always like Kuttchu designs, so attached the Kuttchus made of woolen thread on the edges:
Then with the final application of varnish, the table is ready.

My wish to have a separate craft table for my craft works is fulfilled with this decoupaged small table. Slowly arranging all my craft materials. My wish is to have handmade organizers. So decorating each of those with different ideas. Surely I will take into my craft room when it is completely ready.

Until then,

Love , laugh and live the life to the fullest,
-Ranjana


Saturday, November 26, 2011

Decoupage

Decoupage is an art of gluing pictures to an object. After gluing the picture, it is decorated with colors. Decoupage is done on many things, such as boxes, furniture,pots ,photo frame ,bangles etc. Decoupage jewelries are also made.

I've tried this on an aluminium plate. I used a poster for this. This art needs little bit of oil painting skills.
Here is the one I made on aluminium plate:
The central picture is glued and the rest of the part of the plate, is painted with oil paint. While painting,we should be careful to match the colors of the picture glued.

I have tried this on pots also. Have a look:

I found this picture in a daily news paper. It was black and white picture. I have used ceramic also to make the window and the curtain. This gives the effect that the lady is waiting for someone.
Another pot :


 Here also I've glued a poster. This has the picture of a princess Alankara(decorating herself with ornaments and make up) and her  Sakhis(friends) helping her. Is the Sakhi jealous of her ? Can you see it from her expressions? :-)
And its compared with the Darpana Sundari sculpture. Nice pictures. I cut the pictures from the poster and glued those on the pot. Rest all done with oil painting. Of course 2-3 coat of varnish shall be applied.

Now I'm planning do decoupage on a pot. The picture is deep sea scene. Very exciting.Isn't it? Lots of colors to play with and quite challenging to me. Lets see how it goes.


Google analytics