Pages

Showing posts with label Craft. Show all posts

Monday, October 17, 2016

A journal making to store design papers

I have many designs on papers, like embroidery designs, dress designs etc. I had kept those in a normal paper folder. Artist in me was not satisfied with the plain paper folder. To make it interesting , I thought of decorating the folder to keep all the designs. I haven't used any special technique, just went on doing whatever came in my mind. :)
 It is a folder made of cardboard, I stuck cloth all over the folder. On the cloth, glues some wet tissue.
Folder decoration
Folder with wet tissue glued on it
Once the tissue dried applied , light blue and dark blue paint on it.
File decoration
After application of paint
On the front attached wooden embellishment and painted it with golden color:
File decoration
With wooden embellishment 
Back of the folder with a lock embellishment :
The folder looks better rather than plain folder to store my designs.

Coming up with embroidery projects soon. Keep an eye on my blog:)

Love , laugh and live the life to the fullest,
-Ranjana

Friday, April 8, 2016

Customized photo frame- theme Table Tennis sport

Again was away from blogging for one month. Every year in the month of March I get busy with annual exams of my students. So every year I come with same excuse , "Uff! these exams!". This time it was very hectic.This time I could not check comments, forget about writing a post. I was away from all my craft projects and designing projects. During those hectic days also, I had to make a customized photo frame, as this was an order from my son :).
Being a table tennis player , he wanted to gift his friend , who is also a a table tennis player. So I made this photo frame with theme of  table tennis sports.
Here it is :

photo frame
Photo frame - Theme table tennis

The frame is in the color of table , 2 rackets , a ball and a trophy.

How to make themed photo frame:

Sharing the tutorial to make the photo frame :
Choose photo frame of required size, and paint the frame  with primer:

photo frame
Paint it with primer

Allow it to dry, and on that paint dark green color. I had selected this color, because I wanted to make it look like a table tennis table. You can select color according to theme you have selected.
photo frame
Paint with required color
Using m-seal clay, or any other clay make two table tennis rackets and ball:
photo frame
With clay make rackets and ball
Attach it to appropriate place with fevicol. I chose 2 corners of the frame:
photo frame
Attach it on the frame

Paint it with appropriate colors:
photo frame
Paint the rackets
Here it is ready with the photos of the champions!
photo frame
Ready with the photo
My son liked it very much. And his friend too. His friend told him that it was gift of his life time. What else I want!

Now holidays! So planning to design many sarees and complete pending projects in arts and crafts. Will share about those in coming posts,

Until then,

Love , laugh and live the life to the fullest,
-Ranjana

Wednesday, February 10, 2016

DIY craft- Tutorial to make Sandook(Box) from waste boxes

Sandook is a box , which is used earlier days for storing precious items like jewellery. These were used by king and queens of India for the storage of their jewels. Now also there is a big Sandook in my mother's place, in which many old books are stored. Inspired by the sandook, I made similar box, by a cardboard box.
DIY craft
Sandook made of cradboard

  Here are the steps how I made the sandook: 


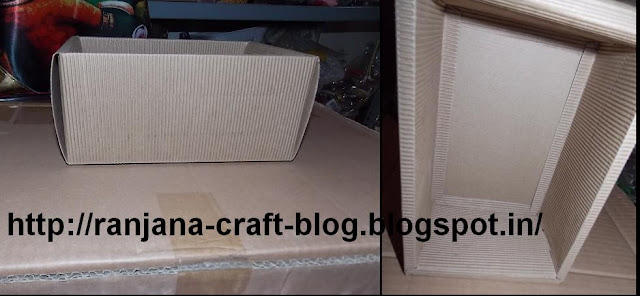
I had these two waste cardboard boxes . One was small and another quite flat one.Here are those boxes:
DIY craft
Two packaging boxes
To making of semi circle sides is quite difficult as it requires exact measurement. I measures the side of the box, and with half of its measurement drew two  semi circles on the card board:
DIY craft
Drawing the semi circles
 Then cut the semi circles along its boundaries:
DIY craft
The semicircles required for the sides
After cutting , the semi circles, bent the other card board piece of same size as the box. And attached the semi circles made out of cardboard on both the sides. The steps are illustrated in image number 4,5,6 and 7. Now the  portion of  of the sandook is made.
DIY craft
Steps to make the lid of the sandook
Next attached this top portion to the cardboard box, with fevicol and a cloth. The reson behind using the cloth was to make it easy to open the lid.
DIY craft
Attach the lid with a cloth on one side of the box
To this box attached  ice cream sticks all over the box, as illustrated int the below picture:
DIY craft
Attach ice cream sticks

It is now ready for painting and decoration! Painted with wood color and attached shiny tape along the corners.

Paint it and attach the border along the corners

Now the sandook is ready for storage:
DIY craft
Sandook is ready
It is now placed in my shelf  which was decoupaged , in my craft room.

I have stored all valuables like my spectacles, pen drive, and some electronics items in this sandook, so those will be easily accessible, as I keep forgetting the place where  kept those.

Will share about some more DIY crafts in coming posts.

Until then,
Love , laugh and live the life to the fullest,
-Ranjana

Thursday, January 21, 2016

Five years of blogging

I have completed five years in blogosphere. Time just flies. Started this blog to share about my experiences and experiments in arts and crafts. Another wonderful year completed , with 30 more posts about different arts and crafts.
Last year , my blog was neglected by me a  bit. I was busy with my other commitments. This year I'm confident  that I will share many posts about different forms of arts and crafts, write about many artists whom I have met and their works, and of course about my projects too.
This blog started with a post about qulling. And , it just went on. This blog is nearing 200 posts. The year 2015 was fantastic year for me as I had learnt many crafts, including siporex mural carving. Year of fulfillment, as I visited many events happening in arts and crafts world including Chitrasante -2016  . I worked on many forms of crafts , like decoupage, card making and punch craft
I converted a small space in my house to a craft room, with a small table decoupaged , and decorated it with a little  idol  of Buddha I bought from Bodhgaya . 
Here is the glimpse of Buddha in  my craft room. About my crft room which I will  share in the coming posts, as still it has to be organised. Otherwise my time was wasted in searching materials :)

Buddha idol
Small Buddha idol in my craft room


Buddha idol
After I have craft space , all the materials are organized properly and I'm able to work on more projects.

Last year I could not work on saree designing. Hardly  2-3 sarees I designed, but very happy with the sarees I have designed. My favourite is the saree which I designed with printings of Jaimini Roy's paintings.
This year planning to share more about saree designing and also include video tutorials about school craft projects.
Five years of blogging has given me pleasure, learning and wonderful friends in the blogosphere. The journey will continue with you all. 
Thank you for being part of my life in this blogosphere.

Love , laugh and live the life to the fullest,
-Ranjana


Saturday, November 21, 2015

Decoupage - shelf

While learning decoupage I had made of on  aluminium plate and recently I had done it on my craft table . As I'm preparing my craft room and decorating with handmade items, thought of decoupaging on a shelf I have.
Here is the shelf, I got it made from a carpenter:
I wanted to give this Victorian look, chose very mild color. Back side first one coat painted with primer and then painted with pista green.
For the top and the sides selected the pista green color paper with rose prints. I just loved the paper!
After attaching and painting , it looks like this:
Decoupage
And now for the inner side of the shelf, I wanted to paste same pista green paper, which I had chosen  for the top and sides. But there was shortage of paper for the inner side. So used two different kinds of papers.
Here is how it looks after pasting the paper:
Decoupage

Decoupage
As a final touch of giving Victorian look , attached the thread lace which my friend had given, to the borders.
This is how it looks now.

Decoupage

Decoupage
I hope it has now at least little bit of Victorian look, what I'm murmuring :-). This I have kept in my craft room, with my craft items. I will share about other handmade items in my craft room in the coming posts.

Love , laugh and live the life to the fullest,
-Ranjana

Sunday, October 18, 2015

Decoupage - My craft table

Returning after a month to blogosphere. Life was hectic, due to father's health issues I had become like a shuttle between hospital and home. Due to stress I could not make anything. Now everything is sorted out. After his bypass surgery, my father is back to normal life. Returned to native Kumta.   Slowly life is coming back to normal. I  needed some refreshment, what else can refresh me other than my passion Arts and Crafts :)


As any craft person, even I always wished to have a craft room. I worked in many forms of arts and crafts, from sewing to paper craft, thread crafts like crochet, tatting , jewelry making, school projects, painting, sketching.... ( jack of all master of none :)). But the major problem with any crafts person is accumulation of crafts materials. I'm not an exception to it. Family members always blame about the loads of craft materials. Its obvious that a crafts person needs a well organized place with craft materials. I also wished the same, but I did not have a separate room for this. I turned a small unused space in my house into craft room.  In a craft room the craft table is very important. For me its comfortable to sit on floor and work on crafts. So I preferred a short table. Got it done by a carpenter. I told the carpenter to not to polish it so that I could decorate it according to my idea.

I thought decoupage will be the best, so chose a picture to paste on it. Here it is, with the picture I selected to decoupage:

First applied the wood primer , and pasted the picture on the top of the table.


The extended the picture with little bit of oil painting:

Finish it with painting on the borders. I thought dull brown color would look better, instead I selected bright colors. As this is the table where I spend time exploring my creativity. It should be bright :)
 I always like Kuttchu designs, so attached the Kuttchus made of woolen thread on the edges:
Then with the final application of varnish, the table is ready.

My wish to have a separate craft table for my craft works is fulfilled with this decoupaged small table. Slowly arranging all my craft materials. My wish is to have handmade organizers. So decorating each of those with different ideas. Surely I will take into my craft room when it is completely ready.

Until then,

Love , laugh and live the life to the fullest,
-Ranjana


Friday, February 6, 2015

Bamboo craft of Chattisgarh

Google+
Bamboo  is a plant which has large diversity in species. From ages , bamboo is used for craft work.

Bamboo craft in India:

Wide range of species of bamboo are found in India. Its majorly grown in North-East  states of India and in Western ghats too. Bamboo craft might have started with making household items like mats, baskets, hand fan etc. Now the bamboo craft covers wide varieties of  household as well as decorative items including furniture. 

Bamboo  craft of Chhattisgarh :

Chattisgarh is a North-Eastern state of  India. Due to its forest cover and availability of bamboo, make this state major producer of bamboo products. The tribal regions of Chattisgarh are main centres for production of bamboo craft. The tribal craftsmen here make many kinds of bamboo items. 

Different items made using  bamboo:

 Recently I could visit one such shop in  a craft fest.    Traditional bamboo baskets have evolved through centuries. Now we can get different kinds of baskets , purses and bags.
bamboo craft
Purses and bags made of bamboo


And also many decorative items: 
Bamboo furniture is nowadays very popular , because of their affordability and also beauty. Chattisgarh bamboo craft includes furniture to cater to different needs, from small chair to sofas :

Chattisgarh's traditional craft include other crafts like , dhokra- bell metals work, loha shilpa- wrought iron craft,ghodna painting etc, about which I will be sharing in coming posts.


Love , laugh and live the life to the fullest,
-Ranjana

Friday, January 23, 2015

Its already four years in Blogosphere

Time just flies! Its already four years completed in blogosphere .  Have written about 167  posts about my experiences and experiments with different kinds of arts and crafts. Tried to introduce some artists and their works.
 Just love this way of following my passion. Above all have got some very good friends in this blogosphere !
2014 was the year of many ups and downs , quit the IT job to become a full time tutor. Started a new venture of making handcrafted fashion jewels. Because of the major decisions in life , life was bit imbalanced, that impacted number of posts too.This year has a good start. Travelled a bit and collected information about different arts and crafts of India. Also equipped with many sources of knowledge about different kinds of craft, like books and articles.
Some are here, the encyclopedia of handicrafts of India: 
A narrative book on sarees of India:
Soon will start posts about crafts of the World. Also, will share many tutorials , which will help craft learners like me.
Thank you all for your support, will continue this journey of sharing about arts and craft, through each post.
Love , laugh and live the life to the fullest,
-Ranjana

Friday, January 16, 2015

Peacock design- carving on Mahabodhi temple

It has been quite sometimes that I had planned to share peacock designs. .  The perfect blend of enchanting colors o the peacock feather, and the pattern have made it used in many forms of arts and crafts.
Peacock feather
Image courtesy- Wikipedia
 I had designed a saree using glitter paint  and a dress with peacock design.  I love to work for some more sarees with peacock designs. Almost all forms of Indian arts and crafts are influenced by peacock designs, may be its Rangoli, embroidery designs, jewel designs, mehandi designs, wood work or carvings in temples. Let me start the series of posts on peacock design with this carving on the walls  Mahabodhi temple of Bodhgaya.  
Bodhgaya
Add caption

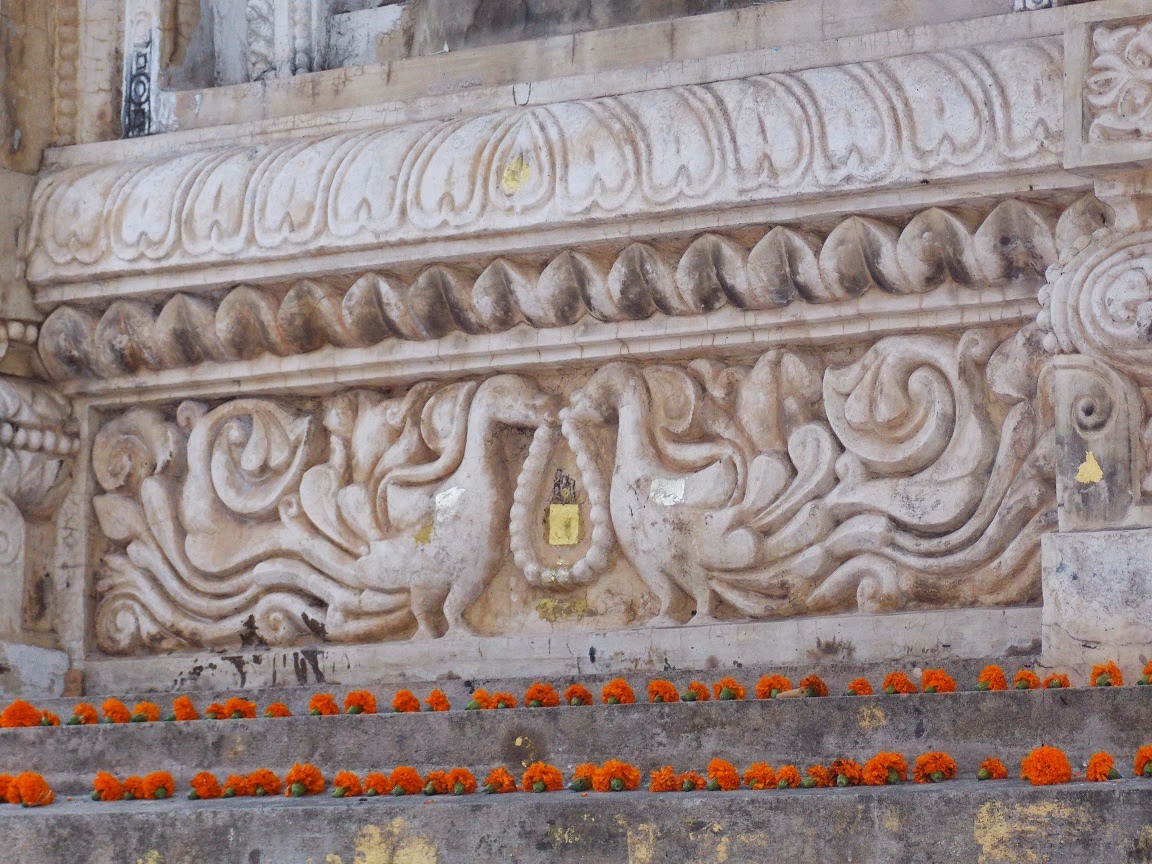
On the outer walls of Mahabodhi temple  there is carvings of Buddha is different meditation postures. Below that the design of two peacocks heading each other is carved.
In another carving the design is  different , the two peacocks are holding a bead strand together.
Mahabodhi temple

Both have very beautiful peacock designs.I'm planning to use in my next project of embroidery. Will share the designs once it is completed. I feel it can be used in Rangolis and paintings too. What do you opine?

I will share many more peacock designs in coming posts, in the section: Mayuri

Love , laugh and live the life to the fullest,
-Ranjana

Wednesday, January 14, 2015

Cutwork - An embroidery which needs lots of patience

Its always embroidery that I like the most in all arts and crafts. But it needs lot of patience. Now embroidery machines are used. As I know, with the machine only few kinds of the embroidery stitches can be made. Cutwork is included in the list of embroidery stitches which can be made using machine. Though it can be made using machine, it needs lots o patience and skill.
Cutwork originated from Italy and migrated to other parts of the world. Hand cutowrk is the traditional way of doing cutwork. Here the embroidery is done on the edges of the design and the inside fabric is cut away. Though I had learnt hand cutwork as well as machine cutowrk, I could not make any remarkable work in cutwork.
I could find the hand cutwork piece with Late Smt Manjula, who was an expert in all kinds of hand embroidery and crafts. Here are cutowrk she made:
cutwork
 This is an elephant design, with cutwork done around the elephant design. Here is the closer view:
cutwork
 Complete work is hand cutowork, really hats off to her patience.
cutwork
Modern technique uses laser cutowrk, in which the designs can be made very precisely.
There are many forms in cutwork, about which Im collecting the details. Soon will share about different forms of cutworks.
 
Love , laugh and live the life to the fullest,
-Ranjana

Google analytics